As we all can see that it is really getting hotter nowadays, and with that obviously the electricity bills are starting to rise at their peak. If you are looking for different ways for staying cool while cutting down on your expenses then this is the right place because we will let you know exactly how to do it with a commercial swamp cooler. A swamp air cooler is no doubt a way better option as compared to any expensive and not eco-friendly air conditioner.
In this article, we will take you through a complete guide on evaporative coolers with all the important information on industrial swamp coolers, how do they work and what to consider before buying a commercial swamp cooler.
What is a Swamp Cooler?
Well, a commercial swamp cooler is basically a water-based cooling gadget that actually uses a special technique that is as old as nature. In the previous times, people used to have wet bed sheets in order to find some cooling effect in the extreme heated weather conditions. This was possible because the temperature difference creates a mild wind that cools down the surroundings. So the question here arises that why you can’t do that with a fan, well this is because you would also need some quantity of water to affect the temperature that is not there in the fan. So in a swamp evaporative cooler, it combines the two variables, that allow you to lower the intensity of the heat in its vicinity.
Kitchen Services provide services for swamp cooler installation in Los Angeles, Santa Monica, Montebello, and around. Our highly skilled team is just one call away. From handling your swamp cooler installation cost to providing you quick and reliable services.
Commercial Swamp Cooler for Restaurants Kitchen

When we talk about keeping a commercial kitchen cool as well as smoke-free, most people suddenly focus on the exhaust system, which is designed in such a way that it takes away all the hot, smoky, smelly air. Even though, we will also have to consider how cool and fresh air is going to get into the entire kitchen and restaurant. That is the main point where the swamp cooler is used in. In case you own or operate a commercial kitchen, you will have to know these four things about swamp cooler for restaurant kitchen.
Is It Properly Sized?
For your swamp cooler to function properly and efficiently they need to be perfectly sized, and it is not just related to the size of the kitchen but as well for the volume of air that will have to be removed by the whole exhaust system. In case the swamp cooler does not produce enough air in order to replace the removed air, you will end up with a vacuum effect in the whole kitchen, which can be the reason for slamming doors and a lot of discomfort for all the employees working in that kitchen. In case your swamp cooler produces too much air, there are high chances that it may cause air currents that would affect the ability of exhaust hoods to suck up hot, greasy air.
Is It Bringing Clean Air into your Kitchen?
It is really very important to ensure if the swamp cooler actually is bringing clean air into your kitchen. In case the unit is drawing outside air, then there are the chances of drawing any sort of contaminants such as pollen or exhaust fumes to get into the kitchen. And if by any chance the unit has mold or mildew inside, there are high chances that it would put out smelly air that may also be loaded with allergens.
Where Are the Water Lines?
Any sort of leaking water lines, as well as drains, can seriously cause a lot of damage to your property especially if it is not noticed and corrected quickly. with the proper knowledge about where the water lines are actually located it would be quite useful the reason that it would allow you to check for signs of any sort of water damage in routine.
When Was the Last Time your Swamp Cooler Was Serviced?
Generally, Industry standards state that swamp coolers must be serviced after every six months. It is really very important to make sure that your unit gets the attention that it actually needs in order to perform at its best. Kitchen Services provide Swamp cooler maintenance services in Los Angeles
How does a Swamp Cooler work?
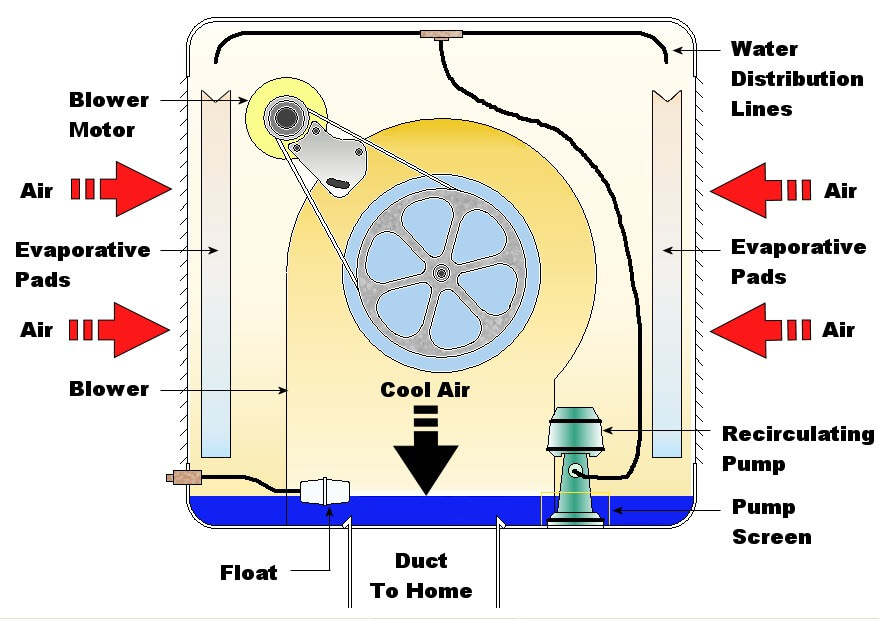
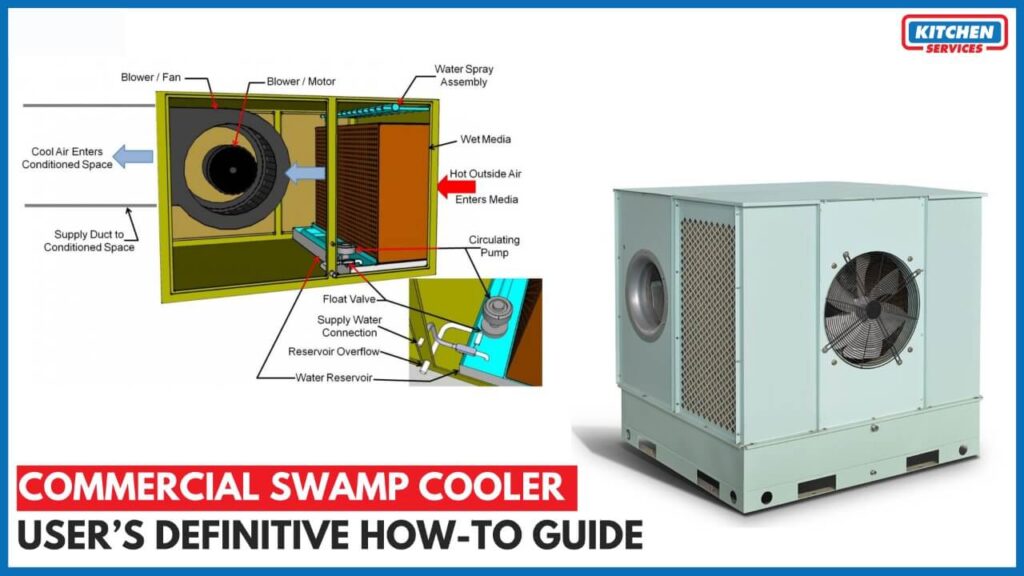
Basically, the swamp coolers are built on one unique property which is water, they basically draw a good amount of heat to evaporate. During this whole process of liquid turning into vapor, the temperature of dry air can drop. The same mechanism is used in our bodies when we sweat, which helps the body cool down when it’s really hot. The swamp cooler has either an inbuilt container for water that can be refilled with a water bottle or straight from the tap if you have good water running down your pipes. Specific builds also allow connecting it to a water pipe to get a continuous water supply. This option is more useful in window swamp coolers and other models made for bigger spaces.
Common parts of a Swamp Cooler

There are basically two key parts in a swamp cooler these are the pads and a fan. The fan is there to power up the evaporation process and cool air delivery. In addition, a significant part of the device’s insides is a pad, that is also called a cartridge or a filter, that provides a surface for evaporation. Whereas an evaporative cooler’s motor is very low voltage, which allows the equipment to use minimal electricity. In case you hire a professional to change the motor in your evaporative cooler, they will look at the size of the current motor and the number of speeds it has before performing any repairs.
How to Make a Swamp Cooler. Can you DIY?
As we have discussed already swamp coolers work on a very simple method that is evaporative cooling. This actually means that they require a minimum of three things to function properly and those are
- Water
- Dry warm or hot air
- Airflow
The DIY versions also rely on water, ice, and a breathable piece of cloth as well. Let us see how you can make Swamp coolers all by yourself.
Gather Tools and Supplies
The first step would be gathering up everything you need for making a swamp cooler. The most important things you will need may include:
- A bucket or any large container. Preferably the one which you can easily modify with the help of some basic tools.
- Drill
- A razor or knife in case you are using a foam container
- An adhesive such as glue, caulking, or heavy-duty tape
- A small fan preferably the one that can be permanently sacrificed for the greater good.
- Water
- Ice (cubes, as well as crushed if possible)
- Cloth (a small towel-size cloth, preferably one with a breathable material)
The list of tools and supplies may differ a bit depending on the exact design you are personally going for
Prepare The Cooler’s Body
One of the main steps to putting together this cooler would be to make its body. The very first thing that you will have to do is to remove the lid and set it to the side. After that, decide exactly how many holes you would want in your cooler, and also how large would you want them. Most people stick with a couple of large holes in the middle of the body or a series of many smaller holes that are concentrated in one area. You can do this with the help of a knife, drill, or screwdriver, depending on the material you are working with.
Attach the Fan to the Cooler’s Lid
After these holes in the cooler’s main body are done, you will have to measure the front of your fan and cut out a big enough hole for it to fit into the lid. Always try to make sure that the hole is a flush fit otherwise the fan will fall into the cooler and short out once it hits the water. After that when the fan’s face is placed against the hole, you can apply whatever adhesive you have available with you to the edges this could be tape, glue, or even caulking. After that leave the adhesive to dry if necessary, before moving on to the next step.
Put it All Together and Try it out
With all these holes in the body and the fan attached to the lid, it is finally time to ensure everything fits together. In case anything is loose in a way that there are gaps around the lip of the lid or anywhere else, you must patch things up before moving on. After all the parts have been placed back together and you have plugged it in otherwise to make sure the fan is working and the air is freely flowing from the soon-to-be swamp cooler, only then you are ready for the final step.
Add Water and Ice And Put to Good Use
As the last step, you will have to fill your new swamp cooler up with water and ice, you will have to make sure that you cover the holes with the cloth that you have found for it. You might have to trim the cloth down to better fit both over the holes as well as inside of the container. After your cloth is situated, and the water and ice have been added, you are good to go. Your very own DIY swamp cooler is ready to make you feel all the cool air throughout the summer season too at a very reasonable cost.
How to set up a Swamp Cooler for summer?

We all know what summers bring for us, all these summer months would be hot and dry. As you get ready to run your evaporative cooler nonstop to maintain a comfortable temperature, there are some basic steps to get your unit prepared for the summer season.
8 Easy and Basic Steps to Get a Swamp Cooler Ready for Summer
Same as there are some steps to follow to get your swamp cooler ready for the winter season, you will definitely have to take steps to prepare it for the summer as well. Each of these steps is important, and you must not skip anything.
De-Winterize
Even before you get your swamp cooler ready for the summer, you will have to de-winterize it and that would be the first step to preparing it for summer. Previously you may have used any cover or even a tarp on your unit in order to protect it from the cold weather. This cover will have to be removed before you prepare it for summer. It would be a good time to examine it for any sort of holes or rips. In case you see any damage, you must get a new one in anticipation of next winter.
Remove the Casing of the Cooler
For this step, all three sides of your swamp cooler must be removed. You can look for any clips that were previously used to keep the panels in their place. Many times, the clips are rotated in such a way that they can be released. Always try to make sure that you note where each panel exactly is so that you can get them back on later.
Clean the Inside of the Unit
In case you have already covered your unit during the winter, there must not be a lot of things to clean. You can simply wipe it all down with the help of mildly soapy water. In case your swamp cooler was uncovered for any reason, you will have to use a shop-vac to get all those dead leaves and other debris that can be is found around the vents and chambers. Any sort of wet rag can also be used in order to get the dust that has already settled into the corners and hard-to-reach areas. A descaling agent that is appropriate for evaporative coolers may need to be used, specifically if there is a considerable amount of mineral buildup in your swamp cooler.
Replace the Filter
The filter must typically be replaced after every year. You may choose to replace it during both the winterization and the de-winterization process as per your convenience. In case you have already replaced it and the filter is still in good condition, you can then leave it alone. If you have not replaced it in a longer time, you will have to replace it. If not changed, the minerals in the water will harden the filter, which would make it hard to absorb the water as needed.
Connect the Water Hose
Previous to the cold weather approaching, you may have already disconnected the water line to avoid any sort of issues. After that, you will have to get the hose connected back to the water supply valve as well as the cooler unit. You will have to use pliers to get a tight fight. Along with that, you may have to secure the drain plug so that you don’t encounter a water leak.
Inspect for Leaks
After you have got water running through the system properly, you may look for any sort of leaks along with the waterline as well as inside of the cooler pan. In case a pipe is somehow punctured or broken, you might notice water right away. Any sort of smaller leaks may not be easy to detect leaking swamp cooler. You may also have to properly adjust the drain plug tighter in case you notice water in the pan. Also in case you find that water is overflowing in the pan, you may have to adjust the float valve. Even if adjusting does not take care of the problem, the valve may need to be replaced before you begin the use of this machine.
In the process of inspecting for any leaks, you must also check for any sort of rust. It would also be a good idea to check the belt that turns the motor. In case you see any cracks, you must think about replacing the belt so that it doesn’t snap as the weather gets hotter.
Run a Complete Systems Check
You will have to run the swamp cooler to make sure that everything is running properly and that it is throwing enough cool air. You may have to lubricate the motor by adding some oil. After that, you will have to fill the water tank and reconnect the power supply. Always make sure that your water pump is working in a proper way and wetting the pads appropriately. Always make sure that the blower is working and can be adjusted accordingly. You can also use the thermostat to make sure that a desirable temperature is being achieved within minutes of everything running.
If by any chance you notice that anything is leaking or not working the way it should work, there comes a time to call a professional. After all, it’s better to get your unit summer-ready now so that you can get repairs completed before the hottest days arrive.
Replace the Casing
After you have checked everything and the system is running properly, you might have to reassemble the cooler just by snapping the panels back into their place. In case any clips break, you will want to replace them. In another case, the internal workings of your cooler will be exposed to too many elements.
Also Read: Swamp Cooler Installation Guide
How to Size Swamp Cooler?
When swamp coolers are concerned there are many different sizes of commercial swamp cooler available, but you might be thinking that how big or small they can be. You may also wonder how big the cooling area can be for different sized evaporative cooling units.
Well, evaporative Coolers range in size based on cubic feet per minute (CFM) as small as 700 CFM up to 8,000 CFM. The dimensions of the smallest unit are 38.5 x 19.5 x 11.5 inches. The larger 8,000 CFM unit dimensions are 68 x 51 x 28 inches. Larger units are available up to 20,000 CFM, which could cool up to 4,000 square feet of space. An evaporative cooler has different dimensions based on the amount of CFM and the space it can efficiently cool. According to the manufacturer, there are various swamp coolers on the market and their specific dimensions.
- 700 CFM – This unit is about 38.5 x 19.5 x 11.5 inches. It can cool up to 350 square feet.
- 1,000 CFM – This unit is about 24 x 24 x 15 inches. It can cool up to 610 square feet.
- 1,300 CFM – This unit is about 28 x 22 x 12 inches. It can cool up to 500 square feet.
- 2,000 CFM – This unit is about 31 x 25 x 24 inches. It can cool 500 square feet.
- 3,700 CFM – This unit is about 37 x 17 x 25 inches. It can cool up to 950 square feet.
- 4,000 CFM – This unit is about 45 x 28 x 17 inches. It can cool up to 1,500 square feet.
- 8,000 CFM – This unit is about 68 x 51 x 28 inches. It can cool up to 2,100 square feet.
Most popular Swamp Cooler brands
An evaporative cooler can be an affordable alternative to any air conditioner, particularly in dry and semi-arid areas with less than 40% humidity levels. They basically use the evaporation method in order to decrease the temperature by up to 15 degrees. When it is compared to air conditioners, they would consume less power. And moreover, they can be used both indoors and outdoors.
Some of the most popular swamp cooler brands are.
- Master cool swamp cooler
- Champion swamp cooler
- Bonaire swamp cooler
- Breezair swamp cooler
What is a swamp cooler FAQs
How much does a new swamp cooler cost?
A new swamp cooler prices can range from small, portable units around $40 each, to permanent, roof-mounted units at $1,600 or even more, that depends on your requirements and needs.
How to drain your swamp cooler?
You can drain your commercial swamp cooler by opening the drain at the bottom of the swamp cooler with the help of a pair of pliers or even a wrench would do the job, also by bailing out the water using a small container. After you have gotten most of the water out, you can soak up the rest with the help of sponges or rags.
Can you run a swamp cooler all day?
Yes, your commercial swamp cooler can be run for 24 hours of the day, but you will have to make sure that it has enough water in it. Manual swamp coolers require you to add water to the reservoir and change the settings so it will run all day efficiently
How much energy does a swamp cooler use?
On average, commercial swamp coolers have been found to be far more energy-efficient for home cooling as compared to air conditioners. Swamp coolers will usually use 15% to 35% of the energy that most traditional AC units would use.
How much is a swamp cooler motor?
A commercial swamp cooler motor replacement costs anywhere from $50 to $600 depending upon your requirements and needs.
Is a swamp cooler better than an air conditioner?
Which one is better Swamp cooler or an Air conditioner? Well, a commercial swamp cooler is considered more energy-efficient for the purpose of cooling your home. They use around 15 to 35 percent of the electricity that is needed by an air conditioner of the same size and require no chemicals.
What are the best pads for a swamp cooler?
Aspen pads are made of aspen fibers woven together. As these fibers are a natural material they can hold water inside the pads better as compared to any synthetic pads. It is very important for pads to hold water and stay saturated to keep cool air blowing through your home
What is the best swamp cooler to buy?
According to recent research, this is the list of some of the best commercial swamp cooler
- HESSAIRE MC18M Portable Evaporative Cooler.
- HESSAIRE Indoor/Outdoor Portable Evaporative Cooler.
- iBaste Portable Air Conditioner.
- COMFY HOME 3-IN-1 Portable Air Conditioner.
- HESSAIRE MC61M Evaporative Cooler, 5,300 CFM.
How much water does a swamp cooler use?
As we know that commercial swamp cooler needs a constant supply of water. Because water keeps evaporating from the unit to cool the air, more water needs to replace. Most water use estimates range from 3 to 15 gallons / 11 to 57 liters per hour, with averages between 7 and 11 gallons / 26.5 and 40 liters.
Can you run a swamp cooler without water?
Well, it is not advisable to run a swamp cooler without water.
Do you need a swamp cooler for the restaurant kitchen?
Commercial kitchens must depend on makeup air handlers for fresh, cool, new air, generally in the form of the commercial swamp cooler.
Where is the swamp cooler off the kitchen hood located?
It is very important to confirm that the commercial swamp cooler actually is bringing clean air into your kitchen. If the unit is drawing outside air, there could be the possibility of it drawing contaminants like pollen or exhaust fumes into the kitchen. And if the unit has mold or mildew inside, it will certainly be putting out smelly air that may also be laden with allergens.
How to winterize a swamp cooler?
To winterize a swamp cooler, turn off the power and drain all water from the unit. Clean and remove the filters and any debris. Cover the unit with a weatherproof cover to protect it from the elements. Store the filters and water pump in a dry, warm place.
How do you drain a swamp cooler?
To drain a swamp cooler, turn off the power and locate the drain valve or plug at the bottom of the unit. Open the valve or remove the plug to allow water to flow out. Ensure the water is completely drained and clean the reservoir if needed.
What are the benefits of using evaporative cooling?
Evaporative cooling is an effective way to bring cool air into hot, dry environments by using the natural process of water evaporation. This form of evaporative cooling works by passing hot air through water-saturated pads, allowing the water to evaporate and lower the temperature of the air that enters the space. When selecting a portable evaporative cooler, it’s essential to consider the cooling capacity measured in cubic feet per minute (CFM) to ensure it is adequately sized for the area you want to cool, taking into account the square feet and ceiling height of the room.
Unlike traditional air conditioners, which rely on refrigerants, evaporative air coolers offer an energy-saving solution by utilizing dry air to effectively lower temperatures without significant energy consumption. This makes them an excellent choice for regions with hot, dry climates, where they can provide wet air coolers that efficiently cool and refresh indoor spaces.

