Installing ductwork for a range hood is a crucial step in ensuring proper kitchen ventilation. The ducting system is one of the most important parts of the whole setup. It’s the enclosed space above your cooker hood that collects smoke, fumes, and steam while you cook. Range hood duct also helps trap harmful air particles that can be released during cooking. Once collected, the duct vents all of that air outside. This improves the air quality and airflow in your kitchen.
To get the best performance, you must choose the right range hood and install it properly. A well-installed exhaust duct makes sure that all the smoke, steam, and fumes leave your kitchen safely. This leaves you with a cleaner and healthier cooking space. If you want to learn how to do it the right way, read through this full guide on range hood duct installation.
Contact Experts for Kitchen Vents Installation
Range Hood Duct Installation Requirements
Installing a range hood duct requires careful planning, accurate cutting, and proper sealing to ensure your kitchen is ventilated safely and efficiently. The process usually involves measuring and marking where the vent will go, cutting holes for the duct and vent cap, fitting the ductwork, and sealing all the connections securely.
What to Consider Before Installing a Range Hood
Before installing your new range hood, it’s important to choose the right model for your kitchen. Here are a few key things to keep in mind:
Power (CFM Rating)
The type of cooktop you have—gas or electric—affects the hood power you need. Gas stoves typically produce more heat and smoke, so they require a range hood with a higher CFM (cubic feet per minute) rating. CFM measures how much air the hood can move in one minute. More CFM = better airflow.
Size & Configuration
Your hood should match the width of your cooktop to ensure it captures smoke and fumes effectively. Undersized hoods won’t perform well. Wall-mounted, under-cabinet, or island hoods all come in different configurations—choose one that suits your kitchen layout.
Lighting
Many range hoods come with built-in lighting. This helps illuminate the cooking surface, making it easier to see while preparing meals.
Venting Type
Check local building codes for venting rules. Most vent hoods work best when they exhaust air outdoors. If exterior venting isn’t possible in your home, consider a recirculating (ductless) range hood with filters that clean and return the air into the kitchen.
Vent Hood Installation Overview
Installing a range hood takes careful attention to detail. While this guide covers the general steps, always read your product’s owner’s manual for specific instructions. Also, it’s best to have two people for installation. If you’re not familiar with electrical wiring, it’s wise to hire a professional electrician.
Tools & Materials You’ll Need for Range Hood Duct Installation
Supplies
- Wall or roof caps
- Metal ducts
- Vent clamps
- Wire connectors
- Building wire
- Weatherproof caulking compound
- Wall-mount range hood
Tools
- Drill with 1 1/4″, 3/8″, and 5/16″ drill bits
- Tape measure
- Level
- Pliers
- Wire stripper or utility knife
- Caulking gun
- Jigsaw or keyhole saw
- Flat-head screwdriver
- Phillips screwdriver
- Metal snips
- Metric hex key set
Step-by-Step Guide to Range Hood Duct Installation
Follow this clear guide for properly installing your kitchen range hood and its ducting system:
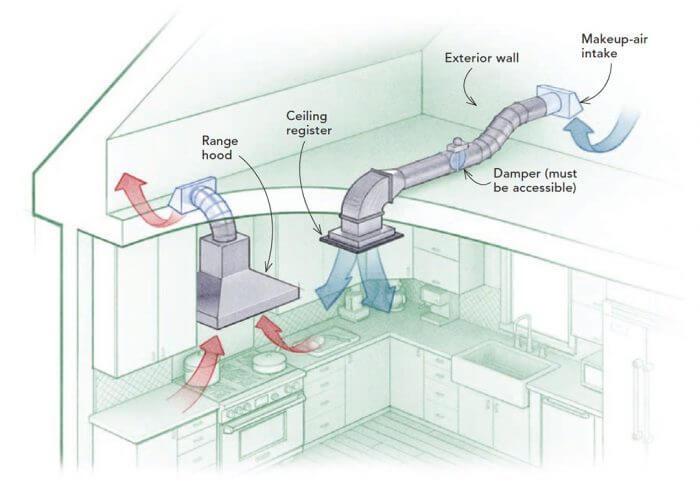
Step 1: Choose the Right Duct Location
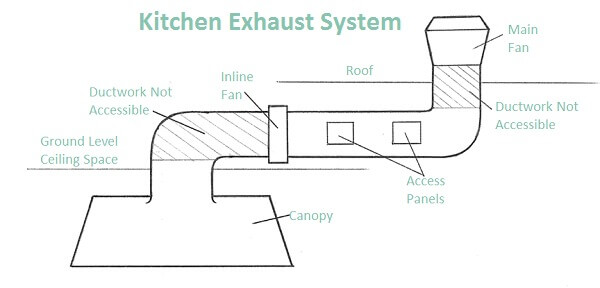
Start by selecting the best path for your ductwork to exit the house. Choose a route that is short, straight, and free from obstructions like studs, plumbing, or electrical wiring. Avoid any blocked areas and aim to vent directly outside through a wall or roof with the fewest bends possible. This ensures better airflow and easier installation.
Step 2: Measure Everything Carefully
Use a tape measure to get accurate measurements of:
- The duct opening on top of the range hood.
- The wall or ceiling where the duct will pass through.
Duct sizes are usually 6″ or 7″ in diameter. Depending on your hood and duct type, you might need a round-to-rectangle adapter. Measure twice to avoid mistakes later during cutting or connecting.
Step 3: Attach the Duct Adapter
Connect the duct adapter to the top of the range hood (if not already built-in). Slide the adapter over the hood’s collar, then secure it with sheet metal screws. Use 2–3 screws around the collar to hold it firmly in place. A cordless drill will help speed up this step.
Step 4: Mark and Cut the Wall or Ceiling Opening
Use a template (often provided with the hood) to mark where the vent will exit through the wall or ceiling. Trace the template using a pencil or marker.
- For walls, cut a hole that runs from the interior to the exterior.
- Use a jigsaw, roto zip saw, or keyhole saw to carefully cut through the drywall and any siding or external wall material.
Tip: Most installations are wall-vented because some kitchens don’t have attic access for roof venting.
Step 5: Install the Exterior Vent Cap
From outside the house, install the wall or roof vent cap. This is where air will exit the home.
- Push the vent cap into the hole.
- From the inside, secure it with drywall screws or mounting brackets.
- Seal all edges around the vent cap using weatherproof silicone caulk to prevent leaks and air loss.
Step 6: Connect the Duct to the Vent Cap
Attach the duct to the back of the vent cap inside the wall. Use vent clamps or sheet metal screws to secure the connection tightly. Seal all joints with foil tape (not duct tape) to prevent air leaks and improve efficiency.
Step 7: Mount the Range Hood Unit
Now it’s time to install the range hood on the wall or under the cabinet.
- Use a level to ensure the unit is straight before final tightening.
- With help from another person, lift the hood and position it over the duct opening.
- Align it properly and slide it into place over the connected ductwork.
- Secure the hood using the mounting screws through the brackets or mounting holes on the unit.
Your Ultimate Guide on Range Hood backdraft damper
Step 8: Connect Electrical Wiring
If your hood is hardwired (not plug-in), turn off power at the breaker, then connect the hood’s wires to your home’s electrical system using wire connectors. Follow the wiring instructions in your owner’s manual.
Step 9: Test the Fan and Lights
After everything is connected:
- Turn power back on.
- Test the fan and light functions on the range hood.
- Go outside and check that air is blowing properly through the vent cap.
Step 10: Install a Backdraft Damper
A backdraft damper is crucial to finish the job. It prevents outside air, dirt, or pests from flowing back into your duct system.
- Install it at the end of the duct, just before the exterior vent cap if one isn’t already built-in.
- It improves energy efficiency and protects your kitchen from backflow and outdoor debris.
Final Tips
- Seal all joints with aluminum foil tape—not duct tape.
- Limit the number of elbows or bends in the ductwork (each bend reduces airflow).
- Always follow manufacturer instructions and local building codes.
- For commercial kitchens, ensure installation complies with NFPA 96 fire code requirements
Importance of Proper Range Hood Ductwork and Ventilation
When installing a kitchen ventilation system, choosing the right range hood ductwork is just as important as the hood itself. High-quality kitchen hood ducting and professional hood exhaust installation ensure that smoke, grease, and odors are effectively removed from your cooking area. A properly fitted range hood exhaust vent or range hood exhaust pipe helps maintain air quality while extending the lifespan of your appliance.
Whether you need hood fan ducting, a new vent for range hood, or complete rangehood exhaust installation, using the correct range hood vent ductwork improves efficiency and prevents costly issues down the road. Many users also upgrade their kitchen range vent or invest in durable exhaust hood duct systems for long-term performance. By following the right steps for stove hood installation and ensuring proper sealing of your range hood ventilation duct, you’ll create a safer, cleaner, and more comfortable cooking environment.
Range Hood Duct Size
When shopping for a range hood, most people focus on the width, CFM (cubic feet per minute), and style. While these are important, one key detail that’s often overlooked is the duct size. The size and structure of your range hood duct are just as important if not more than the hood’s power rating.
Even if your range hood has a high CFM, it won’t work efficiently if the duct is too small. Restricting airflow with undersized ductwork leads to poor performance, extra noise, and unnecessary wear on the fan motor.
That’s why it’s essential to select the correct duct size before finalizing your range hood purchase. Knowing the proper vent pipe size will help you avoid installation problems, improve airflow, and reduce long-term maintenance costs. Choosing the right duct size will also keep your system running smoothly, quietly, and efficiently for years to come.
How do you measure a duct for a range hood?
Here is range hood duct size chart to follow:
| Range Hood CFM (Cubic Feet per Minute) | Recommended Range Hood Duct Size |
|---|---|
| Up to 400 CFM | 6-inch diameter duct (round) or 3¼” x 10″ (rectangular) |
| 400–600 CFM | 6–8 inch diameter duct (round) or larger rectangular |
| 600–900 CFM | 8-inch diameter duct (round) |
| 900–1200 CFM | 10-inch diameter duct (round) |
| Over 1200 CFM | 10–12 inch diameter duct (round) or larger as needed |
Always match your kitchen hood vent duct and range vent duct size to your hood’s CFM rating, and avoid reducing duct diameter — it can cause noise, reduce performance, and strain the fan.
Range Hood Duct length code
Besides choosing the right duct size, the length of your range hood duct is just as important for proper ventilation. A long or complicated duct run can reduce performance, even if your hood has a high CFM rating.
Shorter is Better
A shorter duct run is always more efficient. That’s because the air doesn’t need as much force to reach the outside. The less distance the air has to travel, the better your system will perform—and the quieter it will be.
Minimize Bends and Elbows
Every time your ductwork changes direction, it creates resistance. Each 90-degree elbow adds the equivalent of about 10 feet of duct length in terms of air pressure loss. So, fewer elbows mean better airflow.
Recommended Maximum Duct Length
The general rule is:
- Maximum duct length: 30 feet
- Subtract 10 feet for every 90° elbow
- Subtract 5 feet for every 45° elbow
For example:
- 1 elbow = max 20 feet of straight duct
- 2 elbows = max 10 feet of straight duct
Tip: If you must choose between a 40-foot straight run with no elbows, or a 20-foot run with two 90° elbows, the static pressure loss is about the same.
Vertical Ducting Is Preferred
Since hot air rises, running your ductwork straight up through the roof is usually more effective than venting out through a wall. Vertical ducting supports natural airflow and improves venting speed.
Kitchen Services handles all range hood duct installation requirements – from consulting and designs to getting the required permits, installation, and final inspection. Call our experts in Los Angeles and surrounding areas.
Call an Expert for Vent Hood Installation
Range Hood Venting Options
When planning your kitchen hood vent installation, choosing the right venting method is just as important as the hood itself. Your choice will affect performance, noise, and even code compliance.
There are two main types of range hood venting:
1. Ducted (Vented) Range Hoods
These hoods vent air outside your home through ductwork. They are the most effective because they remove heat, moisture, odors, and smoke from the kitchen entirely.
- Best for: Heavy cooking, gas ranges, or commercial kitchens.
- Requires: Exterior wall or roof access.
- Pros: Quiet operation, better air quality, and code-compliant in many regions.
- Cons: More complex installation and higher cost.
If possible, always choose a ducted system for better ventilation.
2. Ductless (Recirculating) Range Hoods
These hoods filter the air and recirculate it back into the kitchen. They use charcoal or carbon filters to trap grease and odors.
- Best for: Apartments, condos, or kitchens without duct access.
- Requires: Filter replacement every 3–6 months.
- Pros: Easier to install and lower upfront cost.
- Cons: Doesn’t remove heat or humidity; less efficient.
If outdoor venting isn’t an option, a recirculating hood is a practical alternative.
Range Hood Duct Installation FAQs
What is the best type of duct for a range hood?
Always remember that the rigid duct will always provide the best duct option for any ducted range hood. It is considered a flexible duct, high quality, and more lasting than any other options available in the market at this time. While you are choosing the type of duct, make sure that you select the one that will serve you long and that will provide the quality airflow or circulation in your kitchen.
Do range hoods have to be vented outside?
The simple answer to this question would be “No”, range hoods that have no duct, or ductless range hoods can recirculate air back into our kitchen. Though, in order to clean your kitchen air most effectively, you must buy a ducted range hood. More accurately than rearranging the cooking exhaust, it will vacate it from your home completely. This will significantly improve your indoor air quality and is advantageous for your health and safety in the long term.
How far should a range hood stick out?
A range hood should stick out at a minimum half the length of your kitchen range and usually, it does not expand over its full length.
Should I insulate my vent hood duct?
You can insulate your vent hood duct, but it is not really required. Insulating your duct will decrease the noise of your blower if it is in line with the ductwork. It will also help in preventing smoke and greasy air from leaking into your joints and attic.
What is the maximum duct length for range hood?
Your range hood duct should not exceed 30′ for a straight run, 25′ for a run with one elbow, and 20′ for a run with two elbows. The shorter the duct, the better
Can you vent a range hood horizontal?
The ducting may run horizontally or vertically depending on your type of hood. Island hoods must vent through the ceiling, while wall hoods can vent through the wall or ceiling.
What type of duct is best for venting a range hood?
Rigid duct is the best type of duct to vent your range hood. It requires a one-time installation and little to no maintenance as long as you clean your range hood filters. Most rigid ductwork is made from durable stainless steel, as opposed to rigid ductwork which is aluminum or flimsy plastic.
Is it OK to use flexible duct for range hood?
You might be wondering: can I use flex duct for my range hood? No, do not use flex duct for your range hood. Most flex duct is made of cheap materials and will not last nearly as long as semi-rigid or rigid duct. You run the risk of having to clean or replace your duct which is quite expensive.
Can I use aluminum duct for range hood?
Semi-Rigid Aluminum Duct is ideal for kitchen range hood exhausting. This duct is totally noncombustible. It has a maximum operating temperature of 435 degree F.
How to vent a range hood?
You must vent your hood outside your home, through the ceiling or wall. It’s not healthy for smoke, cooking exhaust, humidity, and contaminants to build up in your attic. Instead, run the duct to the outside. This way, you’ll get rid of the smoke and cooking exhaust for good.
How to vent a range hood through a side wall?
To vent a range hood through a side wall, first, measure and mark the desired location. Cut a hole in the wall to fit the ductwork, ensuring it’s properly aligned. Install the duct, securing it with screws and sealing gaps with caulk. Attach the range hood to the duct, then add an exterior vent cap to prevent backdrafts and weather damage.
Can I use flexible aluminum duct for range hood?
Yes, you can use flexible aluminum duct for a range hood, but it’s not ideal. While it’s easier to install, flexible ducts can create more airflow resistance and collect grease, leading to reduced efficiency and potential fire hazards. For better performance and safety, it’s recommended to use rigid metal ductwork, such as galvanized steel or stainless steel.
How to choose the right kitchen range hood for effective ventilation?
When choosing the right type of kitchen ventilation, various options are available, including wall mount, island mount, and cabinet range hoods. For a sleek look, stainless steel kitchen range hoods are popular and durable, effectively removing smoke and odors from your cooking space. If you’re considering ducted range hoods, they require a vent hole to exhaust air outside, while ductless range hoods use charcoal filters to recirculate air back into the kitchen.
Installing a range hood exhaust vent involves connecting wiring connectors and ensuring proper alignment for optimal performance. An exhaust fan within the hood plays a crucial role in maintaining a clean kitchen environment. Whether you opt for a wall mount range hood or an island range hood, selecting the right kitchen hood is essential for efficient kitchen exhaust and overall functionality.
How to install a range hood vent through ceiling?
To install a range hood vent through the ceiling, first measure and cut an opening for the range vent duct. Attach the kitchen range hood vent duct to the hood, then run it vertically through the ceiling to exit the roof or attic. Secure all duct sections tightly and seal joints to ensure proper airflow and safe venting.
How does range hood work?
A range hood (also called a kitchen hood, vent hood, or exhaust hood) works by removing smoke, heat, odors, grease, and airborne particles generated during cooking from your kitchen. Here’s a simple breakdown of how it works:
- In a ducted system, the air goes through a range vent duct or kitchen hood vent duct and is expelled outside.
- In a ductless system, the air passes through filters and is recirculated back into the kitchen.
It keeps your kitchen air cleaner and more comfortable.
Where does extractor fan air go?
Where the air from an extractor fan goes depends on the type of system you have. In a ducted extractor fan, the air is pulled through grease filters and then pushed outside through a range vent duct or kitchen hood vent duct, which helps remove smoke, heat, and cooking odors completely from your kitchen. In a ductless or recirculating extractor fan, the air is drawn through grease filters and charcoal filters that trap grease and neutralize odors. After filtering, the clean air is then recirculated back into the kitchen instead of being vented outside. This keeps the air fresher, although it doesn’t remove heat and moisture as effectively as a ducted system.
How to install ducting for range hood?
- Plan the route: Decide where the duct will go — straight through the wall or up through the ceiling and roof. Keep it as short and direct as possible.
- Check duct size: Use the range vent duct or kitchen hood vent duct size recommended by your hood’s manual (often 6″–8″ round).
- Cut the opening: Mark and cut an opening in the wall or ceiling where the duct will pass through.
- Install the ductwork: Use rigid metal ducting for best airflow. Connect sections with metal foil tape (not screws, which can catch grease).
- Add elbows if needed: If the duct must turn, use smooth, wide-radius elbows to keep airflow efficient.
- Vent outside: Attach a wall cap or roof cap with a backdraft damper to prevent outside air from coming back in.
- Seal and test: Seal all joints with foil tape, turn on the hood, and check for leaks or airflow issues.